


Have you ever checked a way to monetize your blog with Google Adsense. It gave How to register and set up account with Google Adsense.
Now we'll see about entering codes Adsense ads. In this tutorial you will check how to insert the code to display Adsense ads inside your posts in Blogger.
Well, you know that Blogger itself offers an option to insert Adsense ad units through the gadget. If you click on the "generate revenue" will open a list of configuration options for automatic display of Adsense ads.

I particularly did not like this option because it does not give greater freedom to customize the way the ads will appear on the blog. Not to mention the fact that makes the blog somewhat "heavy" advertising.
I chose to insert the Adsense code directly into the HTML template.
Today I will teach you how I did it, so you can also use the same method if you want.
As you noted, I prefer to show ads inside the post, and only in individual page. That leaves my layout more "clean" (at least I think so).
Well, the first step to be followed is: Generate the code.
First of all, it should be noted that for you to proceed with this tutorial requires that you have your Adsense account approved and has already chosen and configured the ads you want to display on your blog and have copied the codes provided by Adsense.
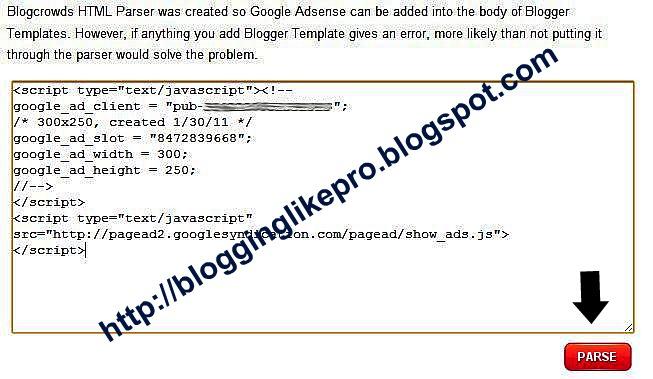
That done, now it will be necessary parse (Convert) the code generated Adsense, because if you enter the code without parsing it, it will give error in the HTML, because Blogger does not accept the language of HTML code directly into the template.
Parsing the code:
Go to this page BlogCrowds and paste the generated code in the box, and click "Parse".
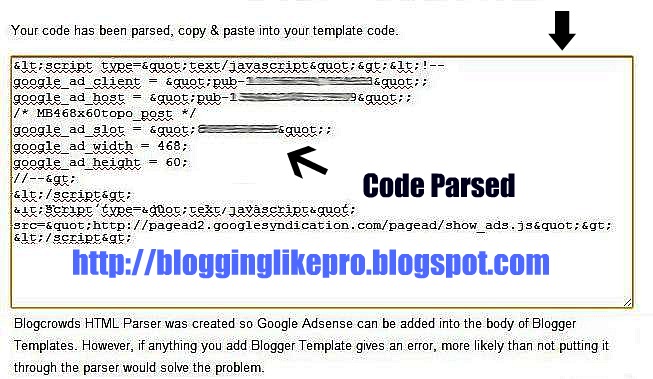
In the box below will be provided the code already parsed (converted), copy it and save!
Place ad below the post title:
This option allows you to display the ad below the title, before the start of the post content.
Go on the "Design" >> "Edit html">> Check “Expand Widget Templates “And look for:
HTML
<div class='post-body entry-content'>
And paste the code just above this section:
CODE
<b:if cond='data:blog.pageType == "item"'>
<div align='center'><br/>

<--- Parsed adsense code here --->

</ Div>
</ B: if>
At the site highlighted in green paste the code generated by Adsense you just parse the site.
In the code above I have stipulated that the ad appears only on internal pages, it will not appear on the home. If you want to appear on the homepage too, just delete the 1st and last line of code that are highlighted in red.
In part highlighted in blue, is the alignment of the ad code. In the case above I have stipulated that the ad is centered, but if you do not want to align the ad, just delete the section highlighted in blue.
If you want it to be on the left side, change "center" for "left". Right: change "center" with "right".
Place ad below the post content:
If you want you can insert ad once at the end of his article, before the footer.
Go on the "Design" >> "Edit html">> Check “Expand Widget Templates “and look for:
HTML
<div class='post-footer'>And paste the code just above this section:
CODE
<b:if cond='data:blog.pageType == "item"'>
<div align='center'><br/>

<--- Parsed adsense code here --->

</ Div>
</ B: if>
Other options:
1) Now if you happen to have installed on your blog to display the resource Biography of the Author of the post at the bottom , paste the complete code (along with the parsed Adsense code) before the code snippet to display the author's biography.
2) If you use Hack "Read More" automatic Also can paste the AdSense code parsed at the very end of the code snippet of the post, which in this case would be just below:
HTML
<div style='clear: both;'/> <! - clear for photos floats ->
</ Div>
3) If you use Blogger's own Read More, You can paste the AdSense code parsed at the very end of the code snippet of the post, which in this case would be just below:
HTML
<b:if cond='data:post.hasJumpLink'>
<div class='jump-link'>
<a expr:href='data:post.url + "#more"'> <data:post.jumpText/> </ a>
</ Div>
</ B: if>
Entering 3 Link units side by side:
If you notice at the end of my posts, the display of ads in the form of block links. In my case, I inserted three blocks and they appear side by side, in the form of a table.
If you want to use the display of the link units in this same way, I will teach you how I did, then just choose the site that you want to place the ad link unit.
CODE
<b:if cond='data:blog.pageType == "item"'>
<div align='center'>

<--- Parsed adsense code here Block (1 links) --->

<td>

<--- Parsed adsense code here (link unit 2) --->

</ Td> <td>

<--- Parsed adsense code here Block (3 links) --->

</ Td>
</ Div>
</ B: if>
NOTE - Recalling that the maximum allowed by Adsense to display ads for blog banner ads are 3 + 3 ad link unit. Be careful not to exceed this limit!
Hide adsense ad static pages:
You can configure the code so that ads do not appear on static pages. To be honest I do not recommend this option, since the intention is to display ads to generate clicks, but woe is you.
The conditional elements to hide the static page is this:
<b:if cond='data:blog.pageType != "static_page"'>The code should look like this:
CODE
<b:if cond='data:blog.pageType != "static_page"'>
<--- Parsed adsense code here --->
</ B: if>
Read also -


